


Shokupan 食パン | Japanese Milk Bread
Course: Bread, BreakfastCuisine: JapanDifficulty: Intermediate1
bread loaf3
hours + Resting Time4 - 8
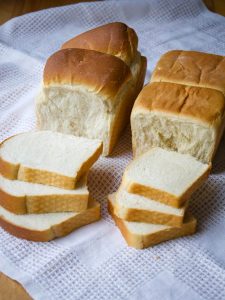
hoursDiscover this delightful Shokupan | Japanese Milk Bread Recipe - showcasing two classic loaf shapes and utilizing the Yudane method. This beloved Japanese white bread, renowned for its irresistibly soft and fluffy texture and milky-sweet taste, is ideal for both sweet and savory sandwiches, toasts, or simply enjoyed on its own. Whether enjoyed at home, purchased from a bakery, or savored in a café, Shokupan has firmly established itself as a staple in Japanese households and cuisine.
Ingredients
- Yudane
100 g bread flour
80 ml boiling hot water
- Bread
300 ml milk (room temperature)
30 g sugar
7 g dry instant yeast
20 g butter (room temperature)
400 g bread flour
10 g salt
Directions
Yudane - Starter
In a bowl, mix 80 ml of boiling water with 100 g of bread flour until you get a smooth mixture. Let the dough cool, shape it into a small ball, and wrap it in plastic wrap.
Allow it to rest in the refrigerator overnight or for at least 4 hours at room temperature.
For the Shokupan Dough
In a large mixing bowl, combine 300 ml of milk, 30 g of sugar, 7 g of dry yeast, 20 g of butter, and the Yudane you prepared earlier, torn into small pieces. Finally, add 400 g of bread flour and 10 g of salt.
Use a dough hook to mix all the ingredients on low speed until they form a smooth mixture. Once the ingredients have come together, knead the dough for another 20 minutes at medium speed. If the dough is too wet after 10 minutes, gradually add a bit more flour, being careful not to let it become too dry. The dough should be smooth and elastic.
Shape the dough into a ball, cover it in the mixing bowl, and let it rise in a warm place for about 1-2 hours or until it doubles in size. To test if the dough has properly risen, poke your flour-dusted finger into the dough. If the dough doesn't bounce back, and the hole you poked remains, it is ready.
Shaping the Shokupan
Knead the dough briefly to remove air, then divide it into three equal pieces and shape them into small balls. Cover them with a clean, damp kitchen towel and let them rest for another 20 minutes.
Roll each dough ball into a rectangle. Fold from the short side to create a piece that's roughly the same length as the short side of the bread pan.
Roll out the folded rectangle again, creating a long rectangle with one short side matching the length of the bread pan. Roll it tightly from the short side and lightly pinch the dough end with the roll to seal it.
Repeat this process with the two remaining dough balls.
Place the dough rolls in the greased bread pan (32 cm x 15 cm x 9 cm), making sure the sealed side is facing down, and the rolling directions of the individual rolls are in opposite directions. The rolling direction is best recognized when orienting yourself by the seam.
Baking the Shokupan
Cover the dough rolls in the bread pan again with a damp kitchen towel and let them rise for another 30 minutes. The dough should rise until about 1.5 cm from the edge of the pan.
Now, you can choose your preferred bread shape. If you prefer a square-shaped loaf or flat topped loaf, this is the time to put on the lid of your baking pan. If you prefer a round-topped loaf, bake the bread without a lid.
Preheat the oven to 180°C (356°F) with both top and bottom heat.
Bake the bread for about 25-30 minutes or until it's golden brown.
Remove the Shokupan from the oven and allow it to cool completely on a cooling rack before slicing. The bread is very soft and fluffy, so it's best to cut it when completely cooled.
Notes
- Bread Pan: For the measurements in this recipe, I used a bread pan measuring 32 cm x 15 cm x 9 cm.
- Yudane Method: Yudane, a water roux starter, contributes to the softness of Shokupan. Let it cool completely before incorporating it into the main dough.
- Room Temperature Ingredients: Ensure that ingredients like milk and butter are at room temperature. This helps achieve a uniform dough texture.
- Brushing with Butter: After baking, brush the top of the bread with melted butter to enhance its flavor and give it a glossy finish.
- Bread Slices: Wait until the Shokupan has cooled completely before slicing. Warm bread can be more challenging to slice neatly, and allowing it to cool helps set the structure. Typically, Japanese Shokupan is sliced into thick slices, ranging from 1 cm to 3 cm (about 0.4 to 1.2 inches) in thickness. These thicker slices are very popular and help showcase the soft and fluffy texture of Shokupan.
- Storage: Store the bread in a plastic bag to keep it fresh for 2 - 5 days. You can also freeze portions of bread slices in a freezer bag for longer storage. This way, you can keep Shokupan fresh for at least several weeks.


2 responses
Hey there! Someone in my Myspace group shared this site with
us so I came to check it out. I’m definitely enjoying the information. I’m book-marking
and will be tweeting this to my followers!
Excellent blog and outstanding design and style.
Thank you so much! I’m glad you enjoy my content!